Tuesday, November 27, 2012

Strike a pose!

This week, we booked one of the vendors that I'm most excited about - our photo booth!

When we started planning our reception, I wasn't totally sold on the idea of having a photo booth. Sure, they're always fun - and everyone likes taking goofy pictures of themselves - but was it really worth the cost? Those suckers can be pricey! But after going to two family weddings this summer, each of which featured a photo booth with tons of props, I realized that the joy of taking group pictures with faux-mustaches and bowler hats was well worth the price. Lucky for me, Mama L came to the same conclusion!

"We have GOT to get one of these for your wedding," she said, as she wound the feather boa around her neck and selected a pair of oversized sunglasses for our third round of pictures.

Me and Pops at my cousin's wedding!
 As soon as I got back home, I started researching vendors. There were lots of choices, but we finally settled on my first choice: Magnolia Photo Booth Co.! They're a teeny bit on the pricier side, but they have a lot of really cool extras that seal the deal - like a coffee table book full of your photos from the event, free custom artwork for your photo strips and a box of ready-to-go props for your dressing-up delight. And the folks at Magnolia couldn't be nicer to work with - they're super prompt at returning emails and answering questions, and they all sound like they would be really fun to hang out with!

Me, Mr. M and Mama L at wedding #2!
 Which is a good thing, since we'll be seeing a whole lot of their attendant on the day of our wedding! Man, they're gonna have to drag me out of that booth. Think a faux-mustache will look good with my wedding dress? I do!

Tuesday, November 20, 2012

Yes to the dress, part 2

When I asked my two best girlfriends to be my bridesmaids, I was determined to be a cool, laid-back bride. "Don't worry," I told them, "you can totally pick your own dress! Whatever you want, as long as it's navy blue!" But as planning progressed and my bridal OCD intensified, I realized that I wasn't really into the mis-matched bridesmaids look. So I had to ask my friends if they would mind terribly if I went back on my word and had them wear matching dresses. They were remarkably cool about it, even after I added the caveat that they should be traditional bridesmaids dresses so that we could find matching dresses in juniors sizes for the junior bridesmaids. (But hey, at least I swore on a stack of Brides magazines that they could have total free range on shoes and accessories!)

Then came the hard part - picking a dress they would both like. (Or at least not totally despise.) Both ladies are gorgeous, but their styles are totally different. Bridesmaid J is into really edgy, high-end fashion, whereas Bridesmaid N has more of a relaxed, urban hippie kind of wardrobe. I was worried that they wouldn't both be able to find one dress in common...

But they did! We finally settled on this cute, flippy chiffon dress from After Six by Dessy:

Photo from RKBridal
I really like this shade of navy - erm, excuse me, "midnight" - and the chiffon selection for junior bridesmaids dresses is totally cute. The bridesmaids are both going to look seriously gorgeous in these dresses, and I think they'll each be able to bring their own unique style on board with their accessories - Bridesmaid J can wear some super-fancy heels while Bridesmaid N rocks some cute chunky sandals, and so on. Totally can't wait to see them walking down the aisle with me!

Friday, November 16, 2012

Our engagement photos have arrived!

And.... I shouldn't have worried so much.


I love them! Our swanky bar setting worked out beautifully, and a great photographer really does make all the difference.


My only regret is not taking pictures of my dress before wearing it! While it's really pretty and flattering in real life, it wound up doing some strange things in the pictures. Nothing a little editing can't fix... but damn, I'll never wear that dress for pictures again!


Aren't we cute anyway, though? Aww.... love!

Thursday, November 8, 2012

Let's get some shoes!

Oh, shoes. My best friend... and oldest enemy. As much as I salivate over gorgeous stilettos, sophisticated Ferragamo flats and hip, chunky-heeled sandals, I can almost never wedge my size 12W tootsies into any of them. For my girlfriends, shoe shopping is a fun, relaxing way to spend an afternoon... but for me, it's more like days of scouring the internet for something even remotely cute. So of course, I had to get a head start on looking for wedding shoes!

I knew I was in trouble the moment I laid eyes on the Kate Spade Charm slingbacks. Fuschia satin... multi-colored glitter... be still, my beating heart!


Unfortunately, this love was not meant to be. Even if I was willing to go all out and splurge on these shoes that I'll probably never wear again - except to work and the grocery store and while doing laundry and like EVERYWHERE, obviously - these works of art do not come in wide widths. 

Heartbreak! I briefly considered foot reduction surgery, but thought I'd give DIY a shot first. After all, a pair of fuschia slingbacks in my size can't be too hard to find, and I could always give them the glitter and Mod Podge treatment at home, right? Faux Kate Spade, here I come!

Inspired, I ran to Paper Source for all the necessary supplies. After dinner tonight, as I started laying down newspaper and rifling through drawers for masking tape, Mr. M stifled a groan. 

"What's the project this time?" he asked.

I yanked an old pair of heels out of my closet and held them up triumphantly. "I'm going to glitter my shoes!" I said. 

Mr. M backed away slowly. "Yeah.... great... glitter! Okay. I'll be in the bedroom playing video games if you need me. Uh... good luck with that."

"Pssh! I don't need luck," I replied, "these are going to be AWESOME."

Approximately five hundred coats of Mod Podge and glitter later:


Meh. I'm not in love. They're definitely sparkly! But the glitter is a little bit lumpy, the tape peeled off funny so all of the lines are uneven, and despite my best efforts, there are still little glitter-less patches here and there. These shoes might be okay for an evening at the club, where lights are low and people are drinking.... but I don't think I want to walk down the aisle in shoes that look like they were made by a moderately talented kindergartener.

Deflated, I went back online to see if I'd missed a potential shoe candidate in my earlier searches. And that's when I found this:

It's the "Romance" shoe from the Glass Slipper collection at DSW. It's not quite as stunning as my first love from Kate Spade, but it hits all the relevant marks - fuschia, glittery, slingback-ed and available in wide width! I snatched them right up, of course. They'll be here in a few days, so please cross your fingers for me! 'Cause if these don't work, I might have to investigate that foot reduction surgery after all.

Sunday, November 4, 2012

Paper Flowers Tutorial #2: "The Gardenia"

This next flower is really simple to assemble, once you get the hang of folding the center petal. I've been calling it the gardenia, even though it's really more of a rose. Hey, like I said before - I'm a bride, not a flower... talkin'... guy.

Um. Right.

Well, anyway, let's get started.

Step one: Punch out five large flowers. (I've been making the center petal gold, but you don't have to. That's just what I like to do!)


Step two: Take two flowers, including your the flower you'll use as the center one, and curl each petal diagonally. (The pink arrow indicates the direction you should be holding your curling apparatus.)


When you're done, your flowers should look something like the two flowers on the right here:


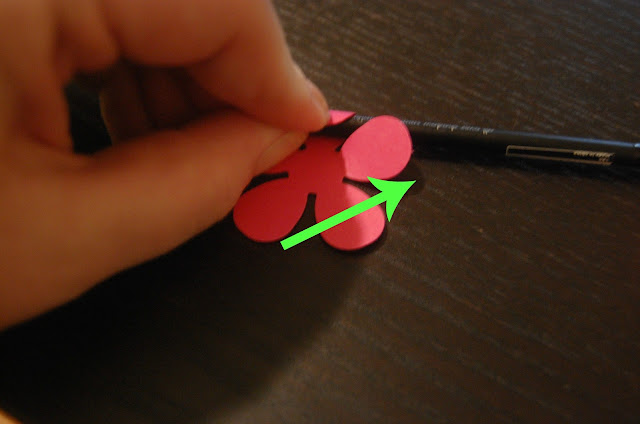
Step three: Curl the petals of the three remaining flowers towards the flower's center. (The green arrow indicates the direction you should be holding your curling implement - basically straight across the petal.)


When you're done, your flowers should like the three flowers on the left in the picture above.

Step four: This is the tricky part... and also the part that I forgot to take a picture of. Please refer to my handy diagram below to see how to turn the center flower into the center rosebud:


After you get each petal folded around it's neighbor, you'll have to hold the finished bud closed for ten to twenty seconds while the glue sets.

Step five: Apply glue to the second diagonal-fold flower shape.


Place the gold bud-shape into the center of the glued flower, then one at a time, fold up each glued petal and attach it to the central bud. In this step, you are pressing the flat part of each petal against the bud and tucking the curled part around the neighboring petal. The finished product should look like this:


(Again, you'll need to hold the petals closed for ten to twenty seconds while the glue sets.)

Step six: Take the remaining three flowers. (Fig. A)  Flip them over. (Fig. B)  Bend each petal towards the center of the flower and crease. (Fig. C)


Step seven: Assemble the gardenia by dotting glue in the center of each remaining flower shape and stacking them, remembering to affix each flower on top of the next with the petals off-set.


Almost there....


Getting closer....

Voila! Your gardenia is finished. Allow the glue to dry, then go in and add a little bit of extra curl to some of the petals with your fingers. Beautiful, no?


Friday, November 2, 2012

Paper Flowers Tutorial #1: "Lily"

After I'd researched all of the various ways that one can make paper flowers, and finally settled on the paper punch method, I got down to business - and found that making these gorgeous little flowers was actually pretty easy! Today, I'm going to do a tutorial on how to make the first - and easiest - of the five flowers. I've been calling this one "The Lily." (Even though I think it really looks more like a mum. But hey, I'm a bride, not a botanist.)

Step one: Remove cat from crafting table.


Step two: Gather your materials. I used the "Retro Flower" punch by EK Success in four sizes: XL, large, medium and small. You'll also need some glue - I've been using Paper Source's PVA glue, but hot glue would probably work, too. Finally, you'll need something fairly thin and cylindrical for poking and rolling. (Insert dirty joke here.) No, seriously though! I'm using an eyeshadow brush from Sephora, though anything relatively small and round will do.

For paper, I suggest using cardstock - it holds the curls and folds better, and will probably make a sturdier finished product. These flowers will all work with regular paper, too, but I prefer the look of cardstock.


Step three: Punch out your shapes. For the lily, you'll need two XL flowers, two large flowers, one medium flower, and two small flowers. I'm using shimmery gold paper for the smallest flowers to add a little bit of contrast, but you could keep it as monochromatic - or as multicolored - as you like.


Step four: Begin bending the petals inwards towards the center... like so:


Step five: Crease and release. Repeat until all petals have been creased.  They will look something like this:


Step six: Begin folding petals one by one down the center of the petal. 


They'll look like this when you're done:


Step seven: Take one of the XL flowers and dot the center with a little bit of glue. Place another XL flower on top of the first flower, making sure to align the petals off-set so they overlap each other like this:


Step eight: Keep going! Dot the center with glue, add the two large flowers, the medium flower and the two small flowers. Each time, make sure that you're positioning the flowers perpendicular to the previous flower.


As you build the flower, it gets more difficult to glue the smallest layers into the center of the lily - so use that poking tool to smush 'em down!


And.... ta-da! You've got yourself a paper lily!

Thursday, November 1, 2012

Family ties

As clueless as I can be about women's fashion, I am even more hopelessly clueless when it comes to men's fashion. Last weekend, I found myself asking strangers at Old Navy whether they thought a navy blue sweater matched the sort-of-gray, sort-of-olive khakis I was buying for Mr. M.

So it goes without saying that picking the groomsmen's attire has left me pretty stumped. The bridesmaids were so much easier - short navy blue dresses with straps, easy as pie! But the men's sartorial choices seemed endless. Tuxedos were too formal for our early morning wedding, but tan suits were too informal. Black suits? Too depressing. Navy suits might work, but then is that just too much navy all at once? And then there are all the different shades of navy blue to worry about - better to just nix the navy suits all together.

We finally settled on gray suits. Gray looks nice on everyone, and it's versatile enough that hopefully our groomsmen will be able to wear their suits again. We're planning on rounding up the groomsfolk during the next Men's Wearhouse BOGO sale and sending them out in pairs to buy their suits. (Nb: I'm not actually sure that this will work - does the free suit have to be the same size at the suit you pay for? If yes, this brilliant scheme will be foiled, since our guys are all different sizes.)

But hey, deciding on a suit color meant that I could finally get down to the fun part of dressing the guys: tie shopping! We're "gifting" the ties to the groomsmen, so we needed to find something affordable... but at the same time, you know, it's our wedding. We didn't want to skimp so much that the dudes had to walk down the aisle sporting some $5 sidewalk vendor ties. Luckily, we found the perfect solution: TheTieBar.com.


Their ties are fantastic, and every single one is just $15. They have extra-long ties and boy's ties, too, so we were able to get the perfect fit for every guy in our party. And, most important, they look and feel awesome - not cheap at all! (I know, I know... I totally sound like a commercial for The Tie Bar. But they really are awesome! And no, I wasn't compensated for this review. I'm just really excited about getting a good deal!)

The wedding party will be wearing the ones on the right; Mr. M will be standing out and looking gorgeous in the lighter pink tie on the left. Rrraowr!